Help:WPClientPluginCuration
From WikiPathways
(Difference between revisions)
(→Installation) |
Current revision (19:14, 30 August 2021) (view source) m (Protected "Help:WPClientPluginCuration" [edit=sysop:move=sysop]) |
||
| (10 intermediate revisions not shown.) | |||
| Line 1: | Line 1: | ||
| - | |||
| - | |||
The WikiPathways Client plugin for PathVisio connects to WikiPathways and allows users to search and browse pathways from within PathVisio. It also enables updating of existing pathways, and uploading of new content. | The WikiPathways Client plugin for PathVisio connects to WikiPathways and allows users to search and browse pathways from within PathVisio. It also enables updating of existing pathways, and uploading of new content. | ||
| - | == Installation == | + | === Installation === |
| - | + | ||
| - | + | ||
* Download and start [http://www.pathvisio.org/downloads/ PathVisio]. | * Download and start [http://www.pathvisio.org/downloads/ PathVisio]. | ||
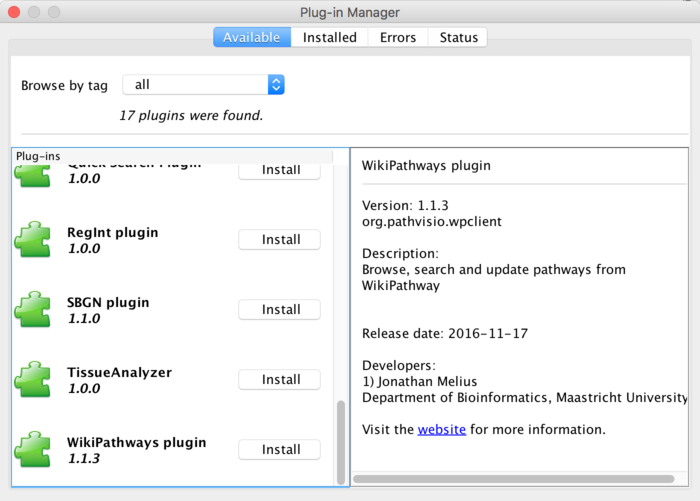
* Open the via '''Plugins -> Plugin Manager'''. | * Open the via '''Plugins -> Plugin Manager'''. | ||
| - | * In the '''Available''' tab, click the '''Install''' button for WikiPathways plugin. When successfully installed the plugin will be | + | * In the '''Available''' tab, click the '''Install''' button for WikiPathways plugin. When successfully installed the plugin will be listed in "Installed" tab. |
| - | [[image: | + | {|class="prettytable" |
| + | |[[image:PVPluginManager2.png|left|700px]] | ||
| + | |} | ||
| - | == Editing an Existing Pathway == | + | === Editing an Existing Pathway === |
For detailed information on how to use the plugin, see the [http://plugins.pathvisio.org/wp-client/ plugin page]. | For detailed information on how to use the plugin, see the [http://plugins.pathvisio.org/wp-client/ plugin page]. | ||
* In PathVisio, find and open your pathway of interest by searching for the pathway identifier (e.g. WP4) or title. | * In PathVisio, find and open your pathway of interest by searching for the pathway identifier (e.g. WP4) or title. | ||
| - | * After making any edits, select '''Plugins -> WikiPathways -> Update'''. You will be prompted to enter your username and password, as well as a description of the edits. | + | * After making any edits, select '''Plugins -> WikiPathways -> Update'''. You will be prompted to enter your username and password, as well as a description of the edits. Note: if you do not have write access yet, please see our [https://www.wikipathways.org/index.php/Contact_Us contact page] to request this access. |
* If the pathway was tagged with the '''Analysis Collection''' or '''Featured Pathway''' tags, you will have the option to update these tags as well. | * If the pathway was tagged with the '''Analysis Collection''' or '''Featured Pathway''' tags, you will have the option to update these tags as well. | ||
| - | == Creating a New Pathway == | + | === Creating a New Pathway === |
| - | * | + | * Launch PathVisio with the WP Client Plugin. |
| - | * Select '''Plugins -> WikiPathways -> Upload New'''. You will be asked to specify your login information and a description of the pathway. | + | * Load the appropriate [https://www.pathvisio.org/downloads/download-bridgedbs/ species database] and the metabolite database, if applicable. |
| + | * Give your pathway name and assign a species: Select the "Pathway Information Area" (upper left corner), and in the "Properties" tab, enter a title in the "Title" field and select the correct species in the "Organism" drop-down. | ||
| + | * Create your pathway. | ||
| + | * Select '''Plugins -> WikiPathways -> Upload New'''. You will be asked to specify your login information and a description of the pathway. | ||
| + | * That's it! Now go to the [[:Special:NewPathwaysPage|New Pathways]] listing to see your pathway. | ||
Current revision
The WikiPathways Client plugin for PathVisio connects to WikiPathways and allows users to search and browse pathways from within PathVisio. It also enables updating of existing pathways, and uploading of new content.
Installation
- Download and start PathVisio.
- Open the via Plugins -> Plugin Manager.
- In the Available tab, click the Install button for WikiPathways plugin. When successfully installed the plugin will be listed in "Installed" tab.
Editing an Existing Pathway
For detailed information on how to use the plugin, see the plugin page.
- In PathVisio, find and open your pathway of interest by searching for the pathway identifier (e.g. WP4) or title.
- After making any edits, select Plugins -> WikiPathways -> Update. You will be prompted to enter your username and password, as well as a description of the edits. Note: if you do not have write access yet, please see our contact page to request this access.
- If the pathway was tagged with the Analysis Collection or Featured Pathway tags, you will have the option to update these tags as well.
Creating a New Pathway
- Launch PathVisio with the WP Client Plugin.
- Load the appropriate species database and the metabolite database, if applicable.
- Give your pathway name and assign a species: Select the "Pathway Information Area" (upper left corner), and in the "Properties" tab, enter a title in the "Title" field and select the correct species in the "Organism" drop-down.
- Create your pathway.
- Select Plugins -> WikiPathways -> Upload New. You will be asked to specify your login information and a description of the pathway.
- That's it! Now go to the New Pathways listing to see your pathway.


