Help:Editing Pathways
From WikiPathways
In addition to editing the text fields on a given Pathway Page, this wiki also supports the ability to edit the pathway itself! Click on Edit pathway on any Pathway Page and a embedded version of the PathVisio program will open with the current pathway loaded. You can then add, edit or delete content from the pathway. When you save, updated versions of the images, controlled text, and data files are generated and are immediately available.
Try it out in the Sandbox pathway!
Contents |
Editing the pathway image
Pathway editing for WikiPathways is done in an embedded version of the PathVisio program. PathVisio supports a number of common drawing tools, as well as an interface for linking objects on pathways to an underlying gene database. For detailed instructions on how to use the PathVisio program please refer to the PathVisio documentation and PathVisio FAQ. In addition to the drawing features described for the PathVisio webstart program, the WikiPathways embedded editor has some additional features.
Adding, selecting, sizing and moving objects
For instructions on basic editing features please refer to PathVisio documentation.
Grouping objects
To group objects, first select the objects to be grouped by click and drag. Grouping the objects can be done in two ways: either right-click and select Group from the context menu or click ^G on your keyboard. The display of grouped objects does not change once the objects are grouped. When the cursor is placed over a group, a boxed outline will appear highlighting the grouped objects. Watch video.
Representing complexes
To create a complex, first select the objects in the complex by click and drag. Creating the complex can be done in two ways: either right-click and select Group from the context menu or click ^P on your keyboard. The display of a complex includes a boxed outline around the group. Watch video.
Selecting grouped objects and complexes
Grouped objects and complexes can be selected as a group, or as individual objects. To select the group as a whole (all group objects), click anywhere in the boxed outline surrounding the group. For complexes, this outline will be permanently visible, and for groups this outline will be visible only when the cursor is placed over the group. To select an individual object in a group, click the object directly.
| Selecting whole group |
|---|

|
| Selecting single grouped object |
|---|

|
Adding connectors between objects
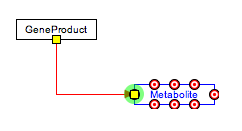
Connecting line objects with gene and metabolite objects on pathways are important for properly storing the biological interactions that the pathway represents. To connect the end of a line to a gene or metabolite, select the end point of the line and drag it close to the object you wish to connect it to. A set of anchor points will appear on the outline of the object. Drag the end of the line over any of these anchor points until the anchor point turns green, then let go of the line end. This will connect the end of the line to the anchor point on the object.
| Adding connectors |
|---|

|
Objects that have anchor points that can be connected to lines are data nodes, metabolites, labels and graphical objects. Anchor points can also be added to lines (from the right-click menu), after which other lines can be connected to it.
Creating curved, elbowed, segmented and composite lines
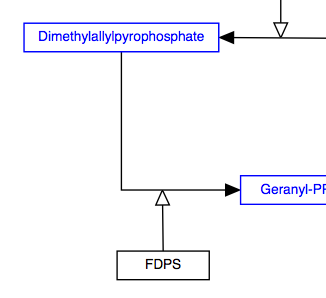
For layout reasons and to properly represent biological interactions, non-straight lines are sometimes ideal. To create a curved, elbowed or segmented line, first create a new line by selecting the line object from the tool bar and dropping it on the canvas. Right-click on the line and under Line Type, select either Curved, Elbow or Segmented. The Curved option will produce a curved line with smooth edges, whereas the Elbow option will create a curved line with 90 degree edges. The Segmented option will let you define a line with one or more waypoints. To position the line, attach the end points to the desired objects as described above. The shape of the curved line will automatically adjust to fit the layout of the objects you are connecting. You can also change the shape of the line manually by dragging the way points (blue diamonds) on the line.
| Elbowed line |
|---|

|
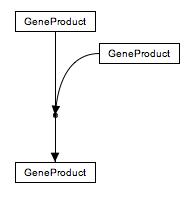
To create a line which is a composite of two or more lines, add an anchor point to one of the lines by using the right-click menu. Connect the end point of the other line to the anchor point as described above. Anchor points on lines can be moved by clicking and dragging to a desired position on the line.
| Anchored line |
|---|

|
Right-click menu
Right-clicking anywhere on the drawing board or on an object will bring up the right-click menu. Some menu options are universal, and some depend ong the type of object you click.
- Delete: Deletes the selected object
- Select all: Selects all objects in the pathway
- Select all data node objects: Selects all data node objects in the pathway, that is any object annotated as gene, protein, gene product, complex or RNA.
- Add anchor: Adds an anchor point to a line, for connecting to other objects.
- Anchor type>Circle: Displays the line anchor as a circle. This menu option is only available for a line anchor object.
- Anchor type>None: Displays the line anchor as a small square. This menu option is only available for a line anchor object.
- Line type>Curved: Creates a curved line, which can be customized in shape by connecting the end points to objects and by dragging the way points on the line. Way points appear as blue diamond shapes on the curved line.
- Line type>Elbow: Creates an elbow line, which can be customized in shape by connecting the end points to objects and by dragging the way points on the line. Way points appear as blue diamond shapes on the curved line.
- Line type>Straight: Creates a straight line.
- Order>Bring to front: Brings the selected object to the front
- Order>Send to back: Sends the selected object to the back
- Order>Bring forward: Brings the selected object forward one layer
- Order>Send backward: Sends the selected object backward one layer
- Add literature reference: Literature references can be added for any object by entering a PMID or by manually entering information on authors, journal etc.
- Properties: Comments, Literature and Annotation for objects can be viewed and edited through the Properties window.
Save to WikiPathways.org
You can save your pathway directly to WikiPathways by clicking the Save the pathway to WikiPathways.org ![]() button in the toolbar.
button in the toolbar.
Editing text fields
Text fields on Pathway Page is edited like any other text on a wiki. Please refer to the WikiMedia website for details on formatting.
Curation Tags
Curation tags can be added to a pathway to notify the author and community about the state of the pathway. For example, you could tag a pathway that isn't annotated properly or tag your own pathway as work in progress. Curation Tags can be added by clicking green plus sign icon in the Curation Tags section. Choose the type of Ontology Tag from the drop-down list and enter a comment if appropriate.
Description
Each Pathway Page includes a Description section, which contains information about the biological process described in the pathway. The Description can be edited by clicking the Edit link to the right of the Description section.
Bibliography
Each Pathway Page includes a Bibliography section, designed to hold reference information relevant to the pathway. When editing a pathway in the editor, any references to publications, textbooks and websites can be added to this section by right-clicking on any object in the pathway and selecting Add or Edit from the Literature menu. Details on how to incorporate literature references can be found here.
Ontology Tags
The Ontology Tags section contains any ontology tags added to the pathway, and an interface for adding ontology tags. To add ontology tags, click the Add Ontology tags! link, which will open two tools for finding and adding ontology tags: a search interface and browsable trees for the supported ontologies. To search for a term, simply begin typing in the Search field. Pick a term from the results and click the Add button (green check mark) to add the term. Alternatively, find a term from the browsable ontology trees, select it and click the Add button. You can delete any ontology term from the pathway by selecting it and clicking the Remove button (red x). To learn more about a particular term, click the View more info on BioPortal! button (blue i).
Creating a new pathway
You can create a new pathway at WikiPathways by clicking the Create new pathway link in the navigation panel on the left side of each page. For details on how to create a new pathway, refer to the New Contributor Quickstart guide.

